Glitter Gel Nail Polish Set: Stunning DIY Home Manicures
A glitter gel nail polish set is the fastest way to make a home manicure look like it came from a salon. The sparkle does the heavy lifting: even a simple application reads as special once the light hits the glitter. The five photos in this post show what a glitter set actually gives you, not just the bottles, but the finished looks, the colour families, and the art pairings that turn sparkle into a style.
A glitter gel nail polish set brings salon sparkle within reach at home.
Each section below follows one photo in order, from a romantic red glitter look board to a six-colour glitter spectrum with nail art. For the detailed application routine behind these looks, our glitter gel nail polish step by step application guide covers the full process.
Each photo below shows a different way a glitter gel nail polish set can shine.
Red Glitter Romance: A Valentine Look Board: Shop the Look
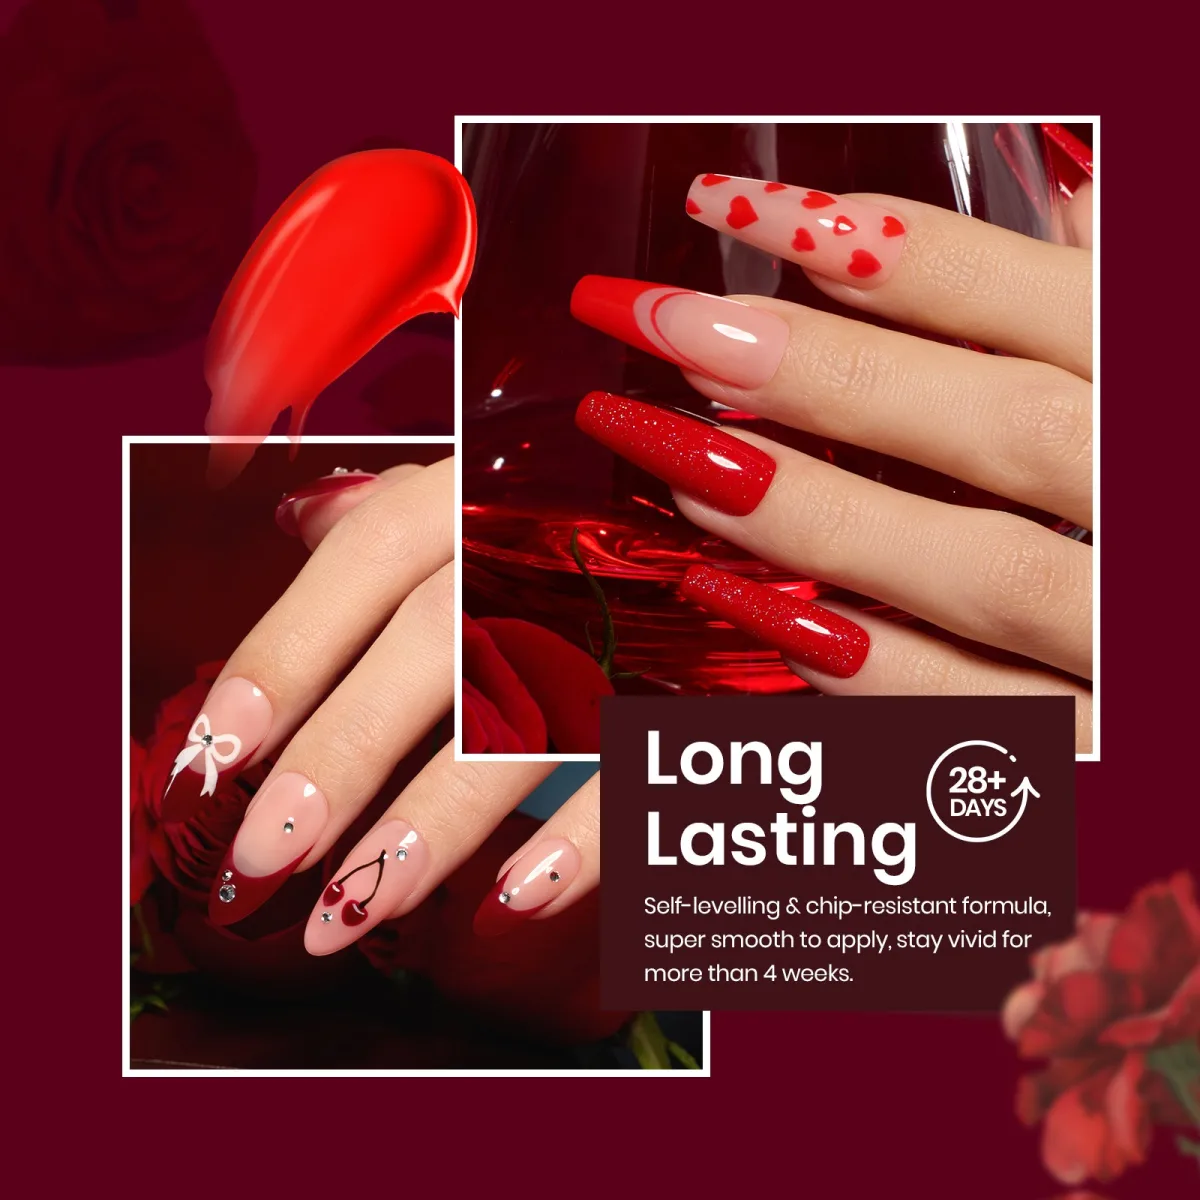
The first photo is a look board, not a product shot, and it sets the tone for the whole post. Against deep red roses it shows two inset photos: long coffin nails in nude with small red hearts, a nude nail with a red French outline tip, and solid red nails carrying fine glitter; then almond nails with red French tips, a white bow with rhinestones, cherry nail art, and nude nails dotted with gems. This is glitter worn the romantic way, mixed with hearts, bows and tiny art rather than worn alone.
A look board like this helps you choose a glitter gel nail polish set for a Valentine evening.
Where this look belongs
Wear this family of looks for Valentine’s Day, date nights, anniversaries and any evening where you want your nails to be part of the outfit. The red fine glitter is the anchor: on two nails it reads festive, on all ten it would read loud, so the photo keeps it to accents and lets the hearts and cherry art do the storytelling. Red plus glitter plus romance is a pairing with no expiry date, and it photographs well because the glitter catches flash and candlelight alike.
Evenings like these are exactly what a glitter gel nail polish set is made for.
Copying the balance
The trick worth stealing from this board is restraint with the sparkle. Each hand shows at most two or three fully glittered nails, and the rest stay nude, French or lightly decorated. That is what keeps a romantic set looking elegant instead of costume-like. If you recreate it, keep your base shades in the nude family, because a sheer base lets the red hearts and the glitter stand out, while a bold base would compete with them. A fine glitter works best here; chunky hex pieces would fight the delicate bow and heart art.
The Four Steps Behind Every Glitter Look: Shop the Look
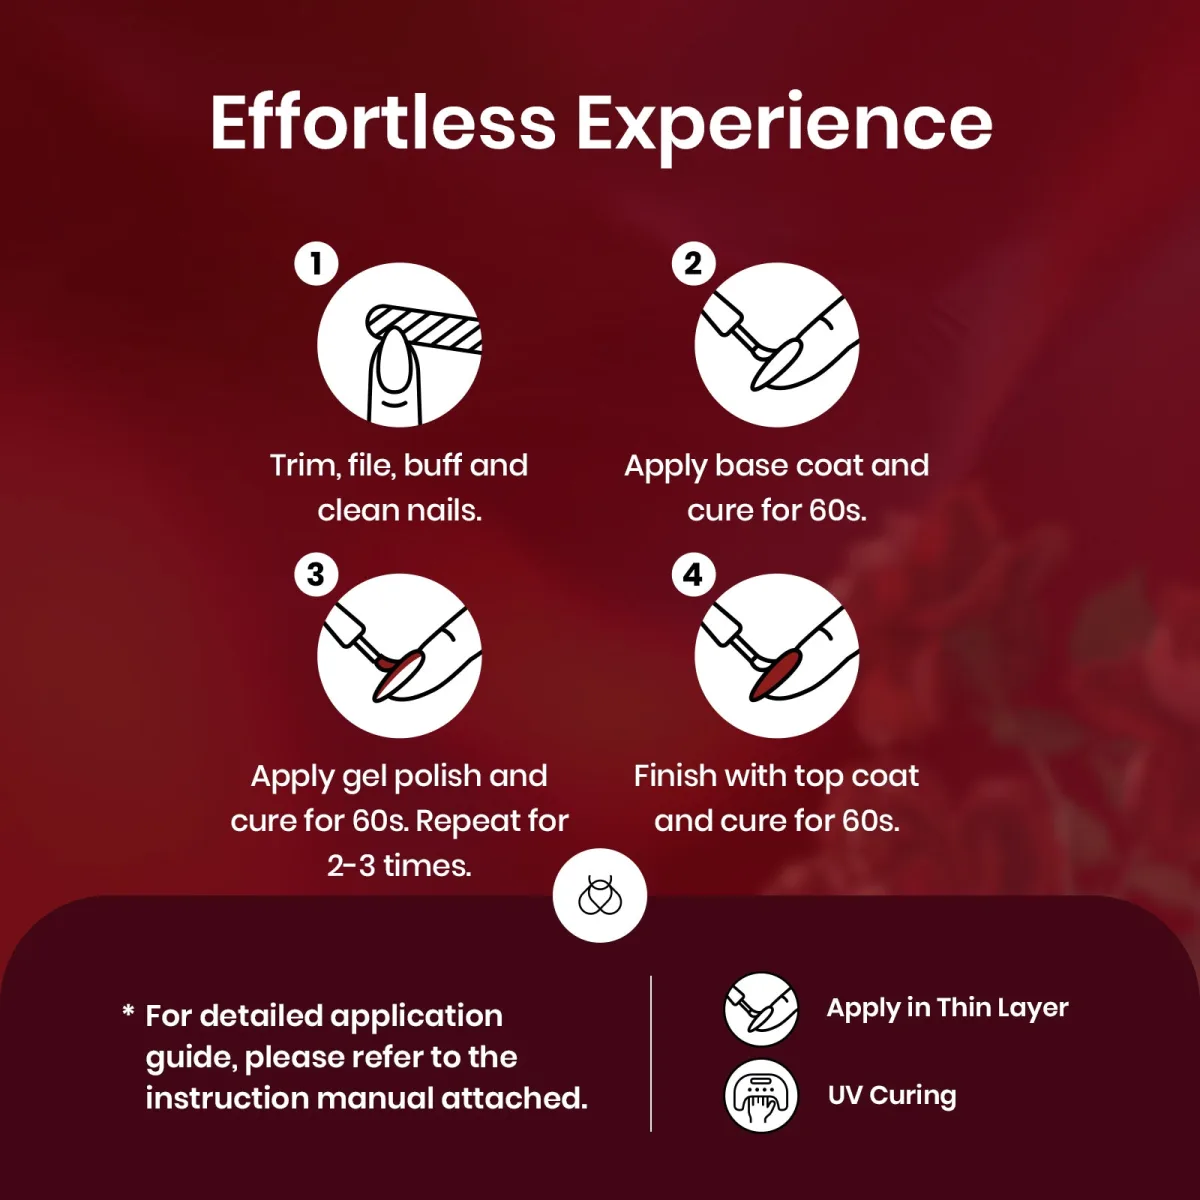
The second photo is an infographic of the four steps every glitter look above depends on: trim, file, buff and clean; base coat and cure; colour coats and cure, repeated two to three times; then top coat and cure. It also carries two notes that matter more for glitter than for creme polish: apply in a thin layer, and cure under UV. The detailed tutorial lives in our step by step glitter application guide; this section is about why the steps exist.
The four steps work for any glitter gel nail polish set, whatever the colours inside.
Why thin layers matter for glitter
Glitter gel is heavier than plain colour gel, and thick coats of it shrink, wrinkle and peel as they cure. The infographic’s thin-layer note is the whole game with sparkle: two thin coats of glitter build more even coverage than one thick one, and they trap fewer air bubbles around the glitter particles. The result is a smoother surface that the top coat can seal properly. Skipped prep is also more visible with glitter, because sparkle draws the eye to every lifted edge and flooded cuticle.
Thin coats are the secret to making a glitter gel nail polish set last without peeling.
The top coat as part of the look
The fourth step is not just protection, it is the finish that decides how the glitter reads. One thin top coat over fine glitter gives a smooth, glass-like shine; very chunky glitter may need the top coat built up so no sharp edges catch on fabric. The photo’s steps are printed as one kit’s wording, so always cure for the times your own polish brand and lamp specify rather than copying the numbers from any infographic.
Six Reds in One Set: Shop the Look
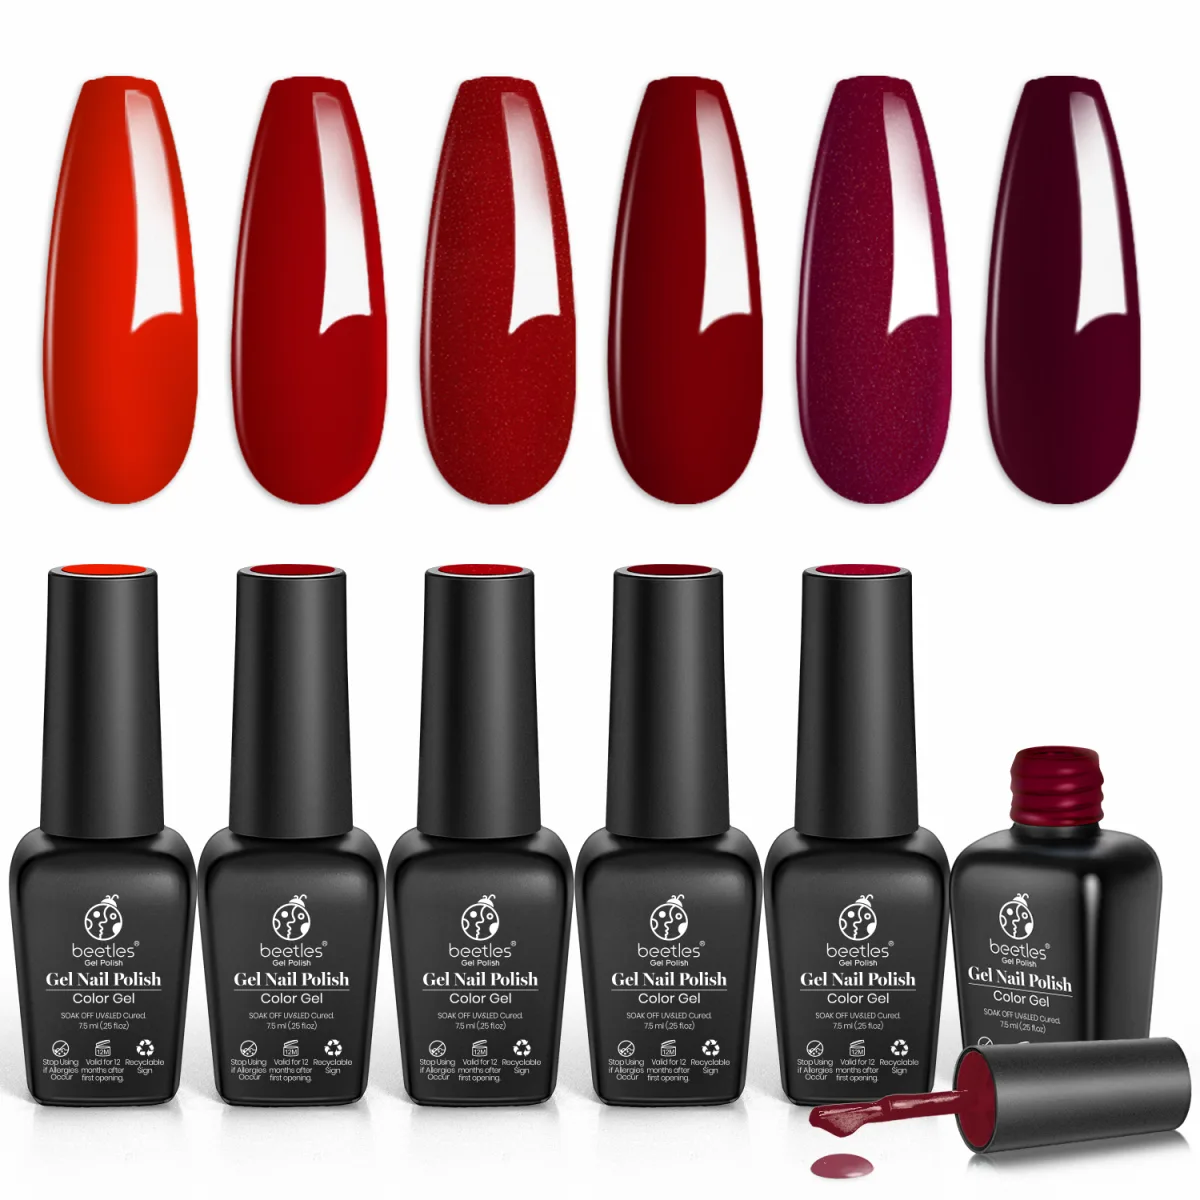
The third photo shows six black Beetles gel polish bottles with six long almond swatch tips in a full red spectrum: bright orange-red, classic red creme, red with fine glitter, deep burgundy creme, a purple-red magenta with fine glitter, and a near-black plum creme. One cap lies off beside a brush loaded with dark red gel. This is the colour family every glitter set is built on, and seeing the six together is more useful than any single swatch, because reds change character dramatically side by side.
Seeing six reds together shows how complete a glitter gel nail polish set can feel.
Reading the red spectrum
Each of these reds suits a different mood and setting. The bright orange-red is the daytime, warm-weather red: energetic and casual. The classic red creme is the all-occasion red that works at work and at weddings. The two glitter reds are the evening reds, made for parties and holidays where sparkle is welcome. The deep burgundy and the near-black plum are the cool-weather reds, formal and dramatic.
If you can only own one glitter set in this family, a classic red creme plus one red fine glitter covers almost every occasion, and our dark red gel nail polish ideas explore the deeper end of this range.
One classic red plus one glitter is a smart start for a first glitter gel nail polish set.
Glitter as one shade among six
Notice how the photo treats glitter: not as a separate category, but as two shades sitting naturally inside the red family. That is the right way to buy a glitter set. Glitter shades should coordinate with the creme shades in the same box, because you will wear them together, as accent nails, as tips, as ombre over the creme. When the glitter and the creme come from the same colour family, every combination matches, and you never have to guess which bottle to reach for.
The Glitter Spectrum: Six Colours, Six Art Pairings: Shop the Look
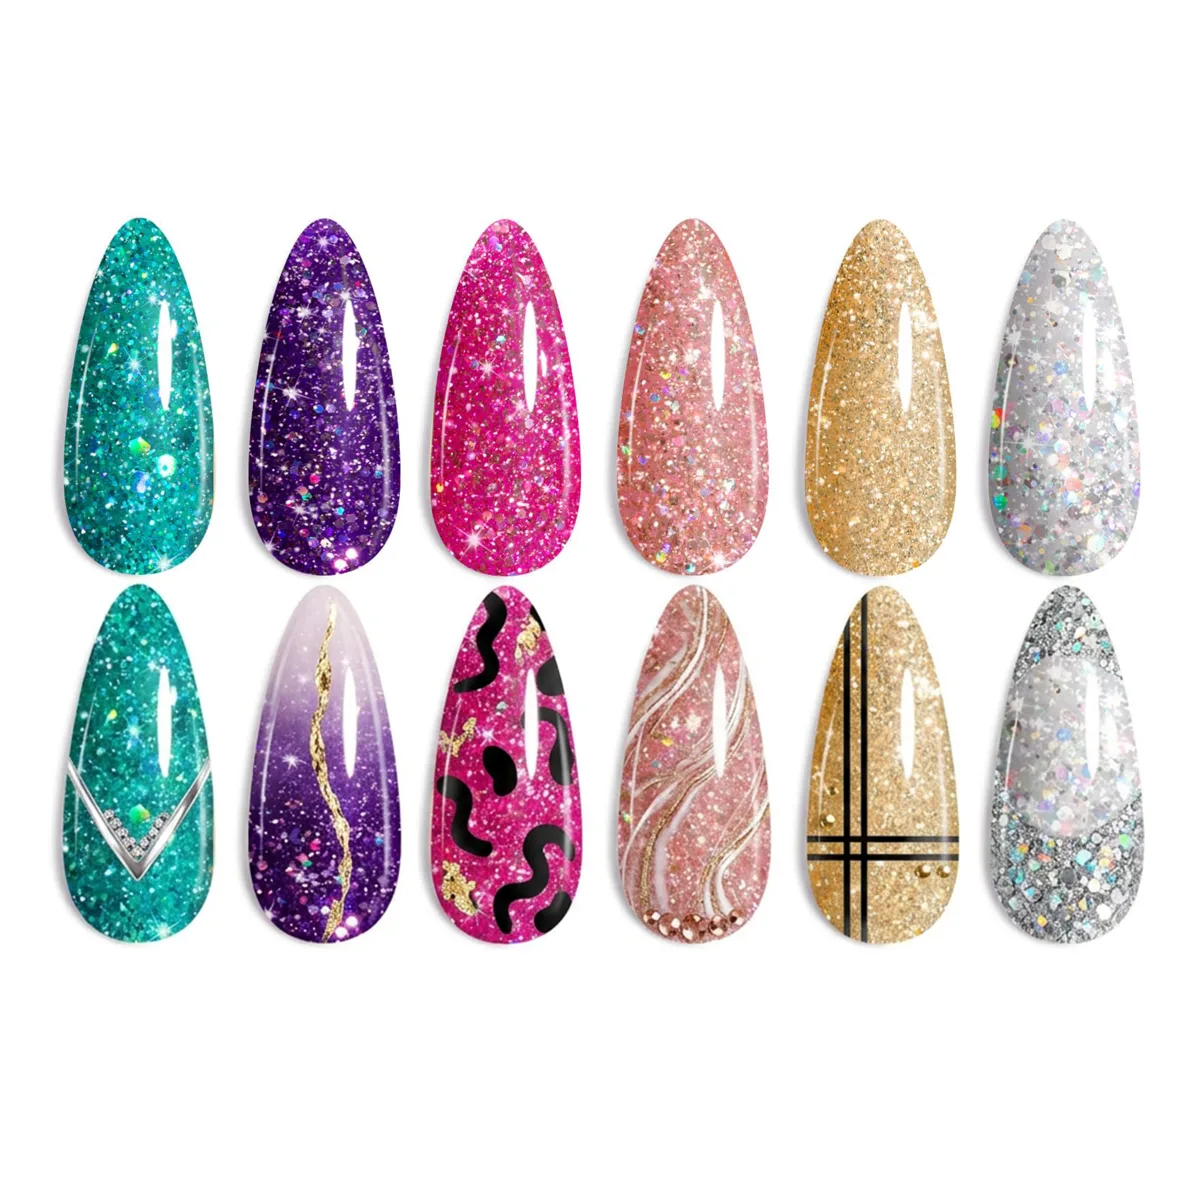
The fourth photo is the most useful in the post. Twelve almond swatch tips show six glitter colours in two columns: teal, purple, hot pink, rose pink, gold and silver-white glitter. The second column wears nail art over each colour: teal glitter with a silver V and rhinestones, purple glitter with a gold squiggle line, hot pink glitter with black squiggles and gold accents, rose glitter with white marble veins, gold glitter with black grid lines, silver glitter with a milky-clear centre panel. This is a full education in how glitter behaves as a background for art.
A spectrum photo is the best guide to building a glitter gel nail polish set around art.
Matching art to the glitter underneath
Each pairing in the photo teaches a rule. Bold glitters like teal and hot pink take graphic, high-contrast art: black squiggles, silver V shapes, gold lines. Softer glitters like rose and silver take delicate, low-contrast art: white marble veins, milky clear panels. The principle is simple: busy glitter wants simple, graphic lines, and quiet glitter can carry finer detail. Gold glitter with black grid lines works because the grid is orderly, giving the busy gold a structure to sit inside.
Building a set from the spectrum
You do not need all six colours on ten nails. Pick one glitter as the hero, wear it on most nails, and use the art column for inspiration on one or two accent nails. The photo’s pairings also show how far glitter goes beyond holidays: teal and gold read festive, but rose with marble veins and silver with a clear panel read everyday, even office-friendly. The coffin and almond shapes shown suit glitter because they give the sparkle a long surface to travel over; OPI’s shape guide notes the coffin shape needs real length to look right.
Picking one hero shade keeps a glitter gel nail polish set wearable every day.
The Boujee Glitter Collection: Shop the Look
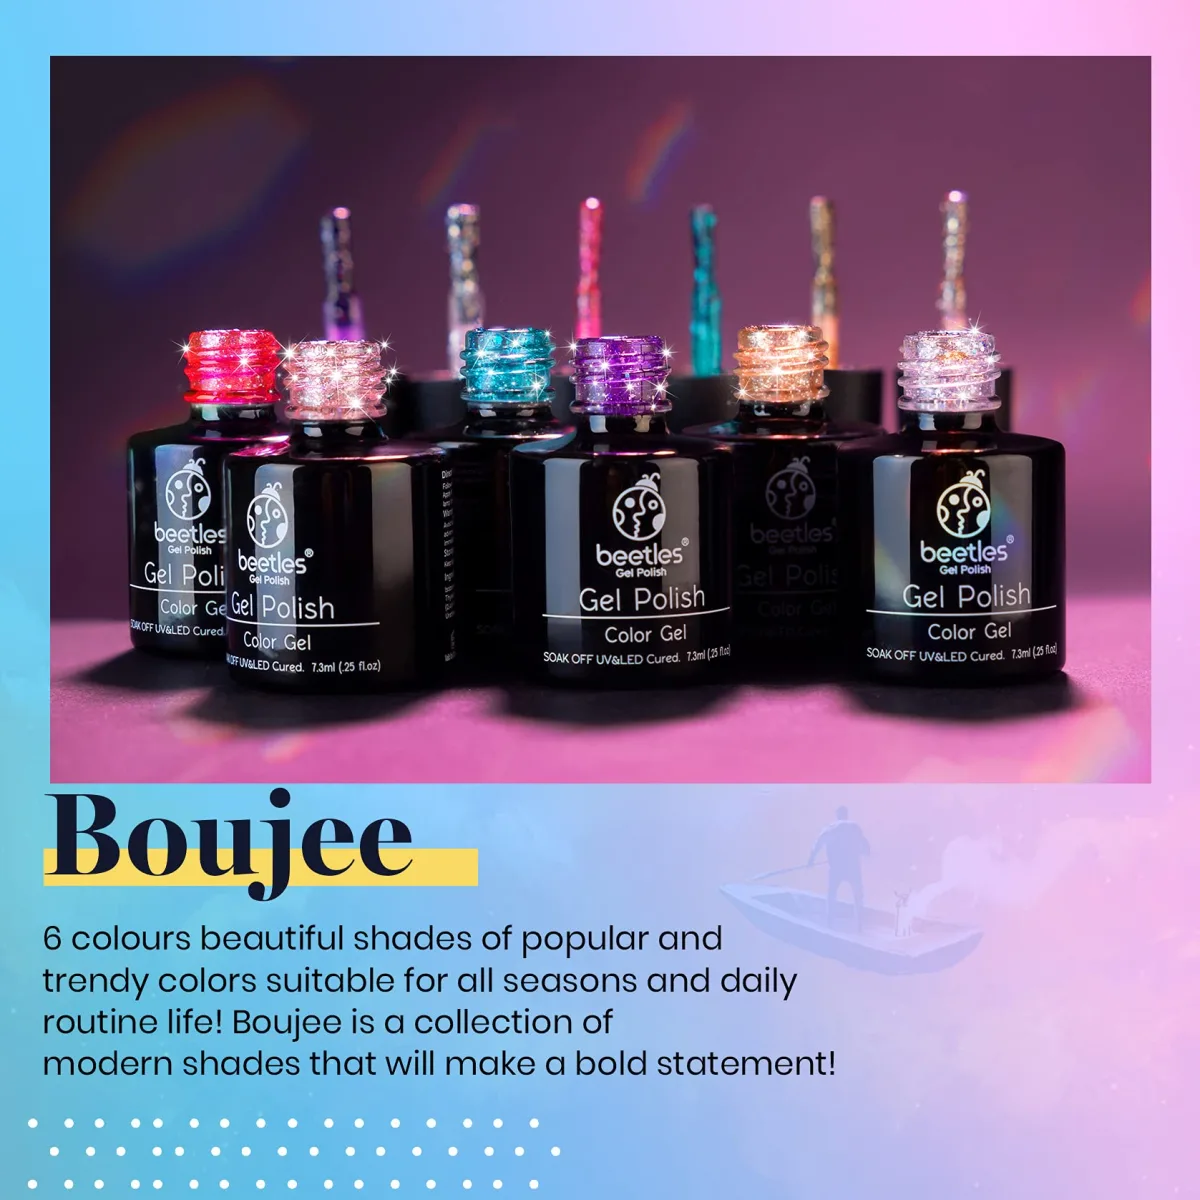
The last photo shows six open Beetles glitter gel bottles, the caps lifted to show the glitter inside: pink-red, rose pink, teal, purple, champagne gold and silver. The printed text calls it a collection of popular, trendy colours for all seasons and daily wear. The bottle count and the claim are the photo’s own wording; what matters for your manicure is the palette logic, which is sound: three warm glitters, two cool glitters, and a neutral silver that goes with everything.
The Boujee bottles show why a glitter gel nail polish set suits every season.
A glitter for every season
This is the only photo in the post that treats glitter as a year-round habit rather than a party trick, and it is right. Champagne gold and rose pink work in spring, teal and bright pink-red carry summer, purple and deep pink-red suit autumn evenings, and silver covers the whole holiday season. Because these are fine glitters rather than chunky pieces, each one can be worn as a full manicure without looking costume-like, which is what makes a collection like this practical instead of decorative.
Year-round wear is the real value of a good glitter gel nail polish set.
Sealing the set
Every glitter in this collection needs the same finishing step: a top coat that smooths the texture and locks in the shine. Glitter surfaces are naturally rougher than creme ones, and an unsealed glitter manicure snags on tights and dulls fast. Apply the top coat generously over glitter, and if the texture still feels rough after one layer, add a second thin layer rather than one thick one. Our gel nail top coat guide covers which top coat finishes suit glitter best.
A smooth top coat finishes a glitter gel nail polish set so it feels like glass.
How to Apply Glitter Gel Polish Set Looks at Home
- Prep first. Trim and file your shape, push the cuticles back, lightly buff the shine off the natural nail, then clean the surface so it is dry and free of oil and dust.
- Apply a thin base coat, capping the free edge to seal the tip. Cure for the time your polish brand and lamp specify.
- Add colour in thin coats, curing each coat before the next. Two coats usually give full coverage; glitter builds better in thin layers than in one thick one.
- Place your glitter accents or art, then finish with a thin top coat, capping the free edge again before the final cure. Add a second thin top coat layer if chunky glitter still feels textured.
- Wipe off any sticky residue if your system requires it, and massage cuticle oil around each nail.
One safety step is worth adding. The American Academy of Dermatology recommends a broad spectrum, water resistant sunscreen with SPF 30 or higher on your hands before a gel manicure, since the polish is sealed using ultraviolet light.
Frequently Asked Questions
Should I wear glitter on every nail or just as accents?
Both work, and the photos show both. Full glitter on all ten nails suits parties and holidays, especially in fine glitter. For everyday wear, keep the glitter to one or two accent nails per hand, as the look board in the first photo does, and wear creme or nude on the rest. The glitter reads as jewellery rather than as a costume.
How do I stop glitter gel from looking thick and bumpy?
Work in thin coats and cure each one before adding the next. Thick glitter coats shrink and wrinkle as they cure, and they trap air around the glitter particles. If the finished set still feels textured, add a second thin layer of top coat rather than one heavy one, since thin layers self-level better.
Can I mix different glitter colours in one manicure?
Yes, and the spectrum photo shows how. Keep the colours in one family, all warm or all cool, or use a neutral like gold or silver as the bridge. The photo pairs teal glitter with silver art and purple glitter with gold art, which works because the art colour stays in the same temperature family as the glitter.
How do I remove glitter gel polish without damaging my nails?
Never peel it off, because peeling pulls layers of natural nail away with it. Buff the shine off the top coat first, then soak cotton in acetone based remover, place it on each nail, wrap in foil and wait at least 15 minutes. Glitter is stubborn, so rewrap any nail that is not lifting instead of scraping, and finish with cuticle oil.
Pick the glitter strength that fits your week, and follow Beautylicious Hub on Pinterest for more glitter nail ideas like these.