Christmas Nail Designs: Festive Holiday Looks to Try
Christmas nail designs work best when they mix a little story with a little sparkle: a tree on one nail, a snowman on another, glitter where the light catches, and one quiet nail so the art can breathe. This post follows five very different festive photos, from a full worn Christmas art set through bow press-ons and a Beetles Christmas polish set to candy cane stilettos and gift wrap sample tips. Each section says plainly what its photo shows, so you can tell a worn look from a product set at a glance.
The thread through all five photos is red, green, white and gold, used in different proportions. Some photos lean on painted art, some on press-ons, and one on polish bottles alone, which means you can build christmas nail designs with the skills and time you actually have, rather than copying the hardest photo first.
Tree and Snowman Worn Art: Shop the Look
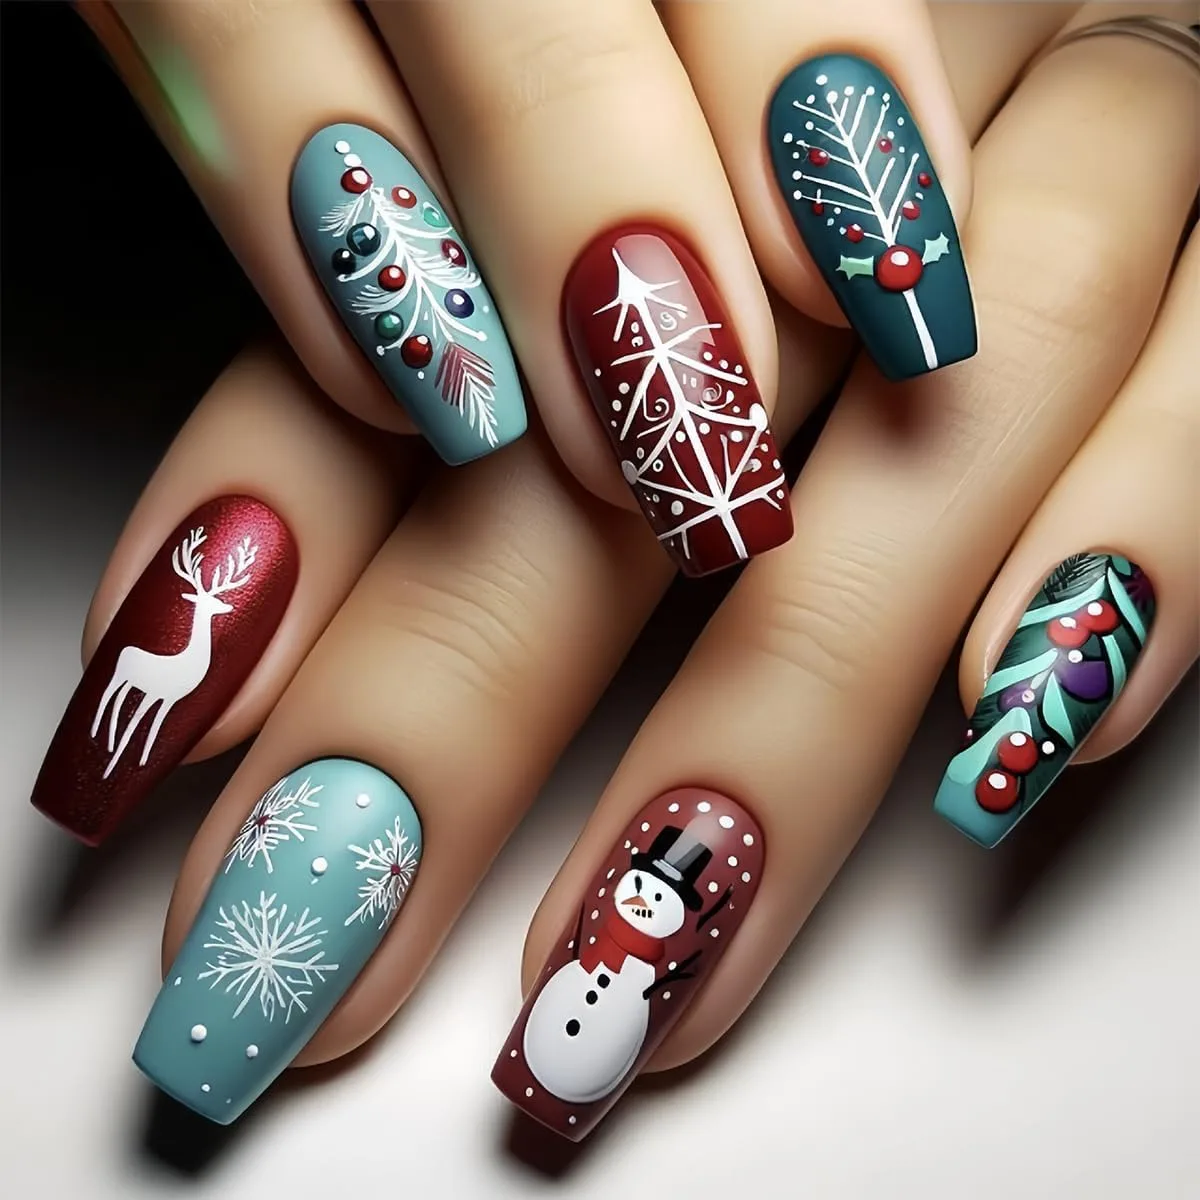
The first photo shows a worn set of long coffin nails covered in Christmas art. Two teal green nails carry white trees with coloured baubles and holly, a burgundy nail carries a white tree, a shimmer red nail carries a white reindeer, a teal nail carries white snowflakes, a burgundy nail carries a snowman in a black hat and red scarf, and a teal nail carries holly leaves and red berries. This is the storybook chapter: every nail tells a different part of Christmas, held together by teal, burgundy, red and white.
A set this detailed works because the art is balanced across the hand. If you copy this look, choose three motifs at most for one hand, tree, snowflake and snowman, for example, and repeat them, rather than painting a different motif on every nail.
Painting trees that read clearly
A painted tree reads best when it is simple: a white trunk line, short branch lines, and a few coloured dots as baubles, on a solid base. Keep the tree to one or two nails, and finish with clear top coat to seal the thin lines. Our holiday winter post covers broader winter looks.
Snowman and reindeer accents
Character nails like a snowman or a reindeer work best as single accents, because a face needs space to be recognised. Place the snowman on a ring finger and the reindeer on a thumb or middle finger, keep the other nails in solid teal or burgundy, and the characters become the surprise of christmas nail designs like this. In christmas nail designs, one character nail per hand is usually enough, and two at most, since more faces compete for attention.
Pink Bow Press-On Set: Shop the Look
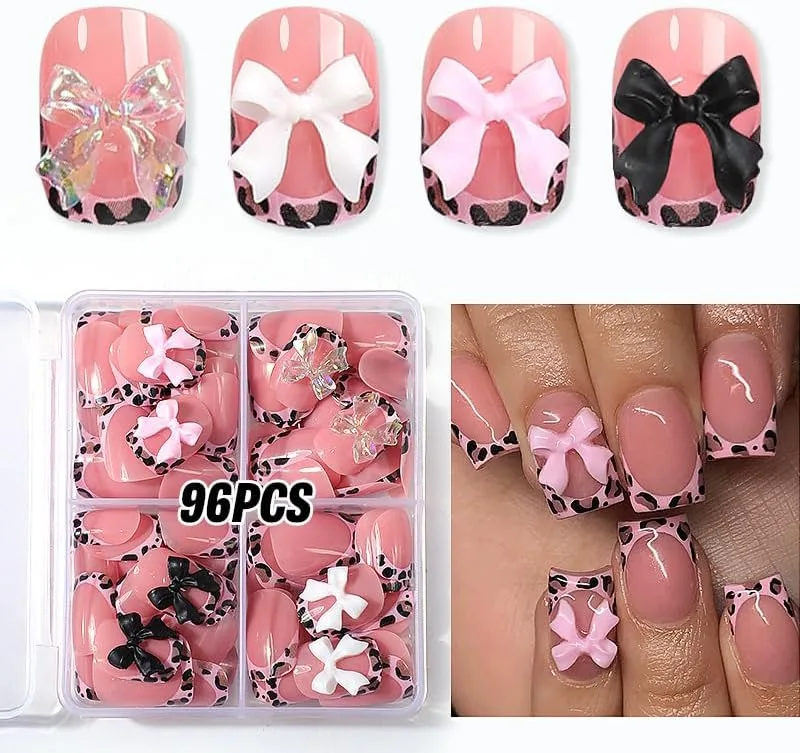
The second photo shows a press-on set, 96 pieces, in pink short square tips with black leopard print French edges and 3D bows in iridescent, white, pink and black. The photo shows four single tips at the top, a compartment box full of tips below, and a worn hand with glossy pink nails, leopard edges and pink bows. This is the gift wrapping chapter: pink and bows read as present ribbon, while the leopard edge adds a playful twist that stops the set looking purely sweet.
Short square press-ons suit festive weeks well, because they are practical for cooking, wrapping and typing, yet the bow gives them a party finish. Choose the size that fits each nail without overlapping the skin, since a press-on that pinches or rocks will lift sooner.
Fitting press-ons without lifting
Good christmas nail designs in press-on form start with fitting, not glue. Lay out all ten sizes first, reject any piece that pinches or rocks, clean and dry the natural nail, and press each tip evenly, close to but not on the cuticle. Avoid water and heavy hand use straight after applying, and keep bow nails on ring fingers.
Bows as a festive accent
Bows work best as accents in christmas nail designs, not on every nail, and this set proves it: the worn hand pairs bow nails with plain leopard edge nails, so the bows stand out. If you love bows, wear them on two nails per hand and keep the rest simple, and the set stays festive rather than costume-like. Our elegant press-on post shows quieter press-on styles, useful if you want one festive hand and one calm hand.
Beetles Christmas Polish Set: Shop the Look
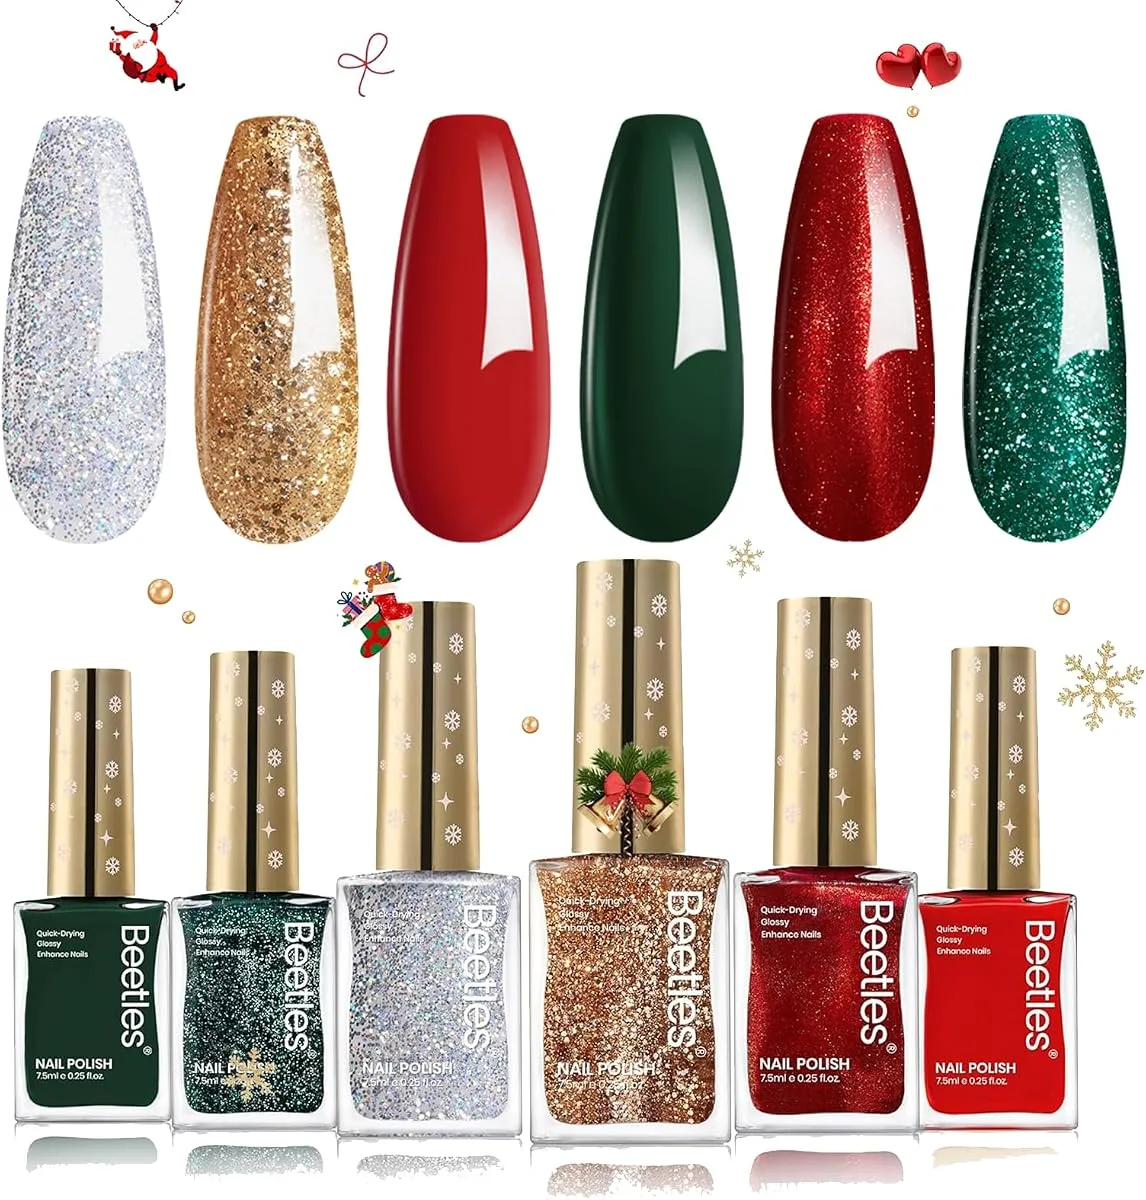
The third photo shows the only polish set in the post: a Beetles regular nail polish set, six bottles, 7.5 ml each, with gold caps patterned with snowflakes, in dark green, green glitter, silver glitter, gold glitter, red glitter and bright red, with six matching long almond swatch tips above. Small Santa, stocking, heart and snowflake graphics decorate the photo. This is regular polish, not gel, so it needs no lamp and removes with ordinary remover, and that makes it the flexible chapter of the post.
Six shades form a complete Christmas palette: dark green and bright red, silver and gold glitter, and green and red glitter for party nails. You can paint a full classic set from these bottles alone, or use the glitters as accents over a solid base from another set.
Classic red and green pairings
In christmas nail designs, red and green only work together when one of them leads. Paint four nails red and one nail green, or four nails green and one nail red, and the set reads as intentional, while equal red and green on every nail can look loud. Glitter breaks the tie: a silver glitter accent nail between red and green nails calms both colours.
Glitter accents over solid shades
Glitter polish works best thinly and deliberately, since a thick glitter coat can look lumpy and hide the base colour. Paint solid red or green first, add glitter to one or two accent nails, and finish with top coat to smooth the glitter texture. In christmas nail designs, glitter is the shortcut to festive, and one glitter nail per hand often gives more sparkle than a full glitter set.
Candy Cane Stiletto Nails: Shop the Look
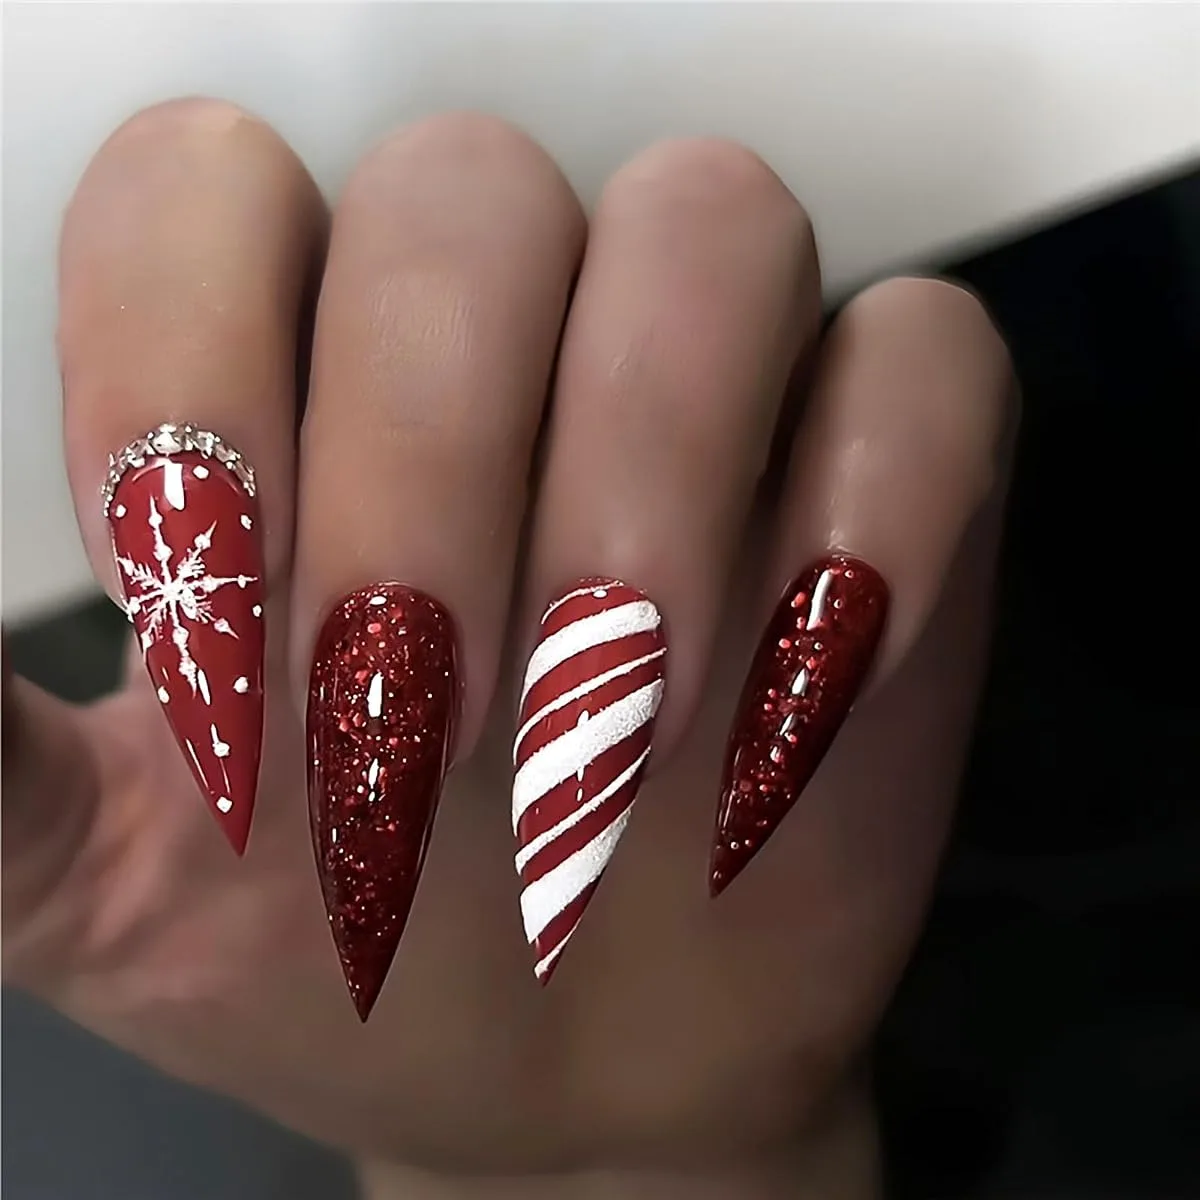
The fourth photo shows a worn hand with long pointed stiletto nails, all in red. One nail carries a white snowflake with a rhinestone curve at the cuticle and white dots, two nails are covered in red glitter, and one nail carries diagonal red and white candy cane stripes with a sugary white texture. This is the boldest photo in the post: stiletto length plus deep red plus one graphic stripe nail reads as party nails.
Stiletto nails demand neat application, because a pointed tip shows every slip. The snowflake nail in this photo works because the base is a clean solid red, so the white lines stand out crisply, and the rhinestone curve adds sparkle without crowding the snowflake. Candy cane stripes need the same discipline: straight diagonal lines, even widths, and a steady hand, or the stripe wobbles and the whole nail looks rushed.
Keeping stiletto nails wearable
Long stilettos are beautiful but impractical for heavy hand work, so plan christmas nail designs like this for a party week rather than a work week. Keep nails smooth and tips even, moisturise cuticles daily, and avoid using nails as tools. If stiletto length feels too much, the same red, glitter and candy stripe design works on almond nails, which are softer and sturdier.
Candy stripes without wobble
Candy cane stripes look best when the red base is fully dry before white stripes are added, since wet red bleeds into white and turns the stripe pink. Use a thin striping brush, load it lightly, and paint each stripe in one confident stroke. Finish with top coat to seal the stripes, and keep stripes to one or two nails per hand.
Gift Wrap Sample Tips: Shop the Look
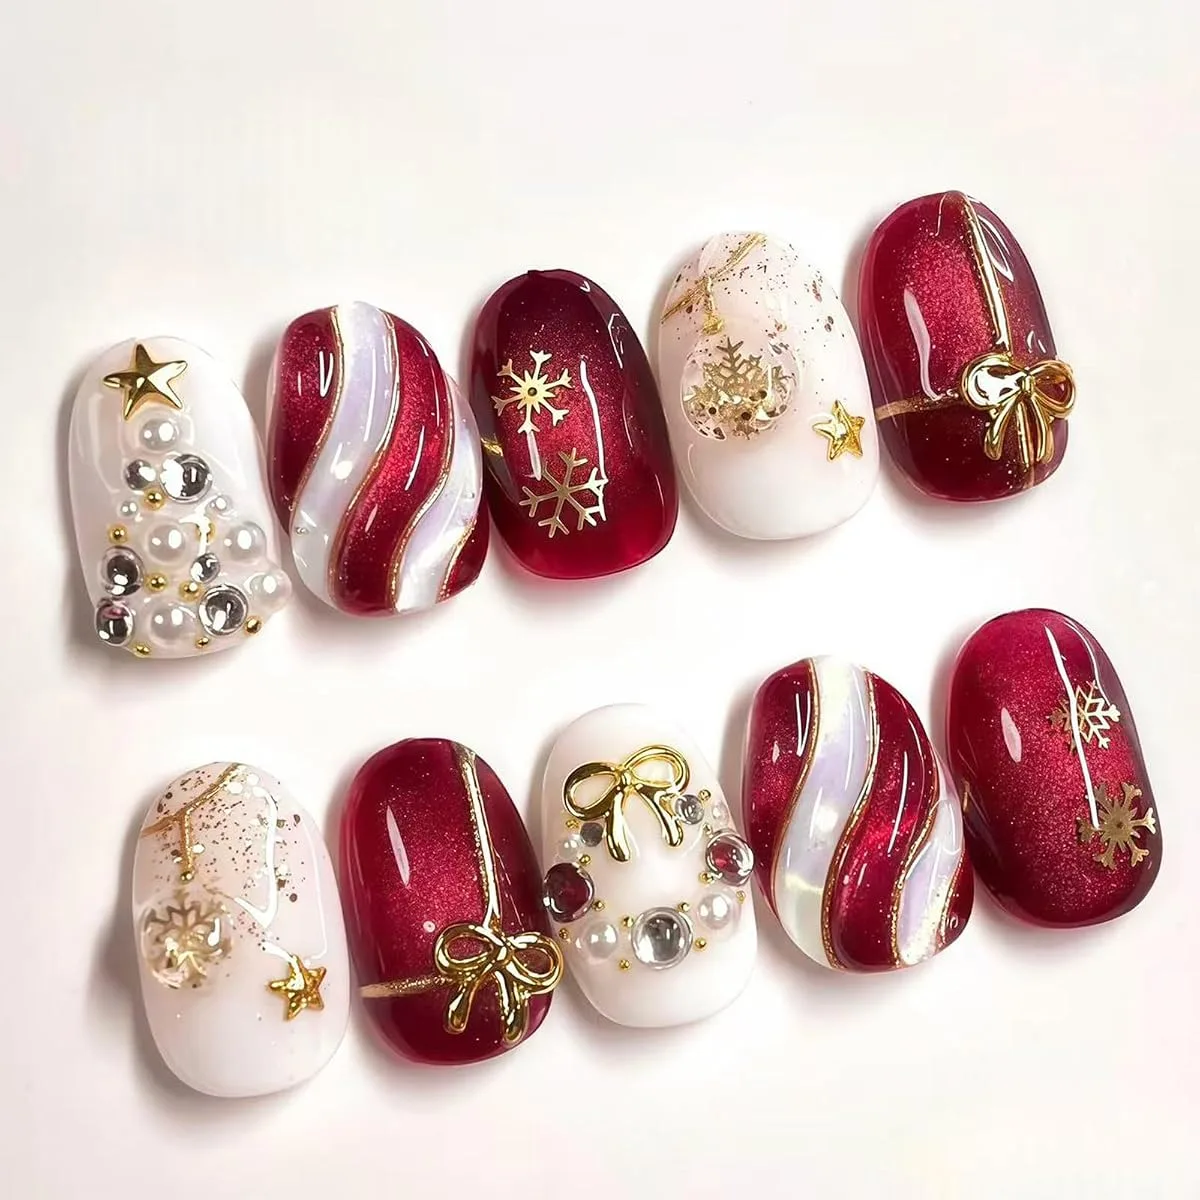
The fifth photo shows ten sample tips, short oval, in red and white with gold detail, laid out in two rows. The designs include red nails with gold gift wrap bows and gold lines, red and white candy swirl nails with gold edges, red nails with gold snowflakes, white nails with gold snowflake charms, gold stars and glitter, and white nails with gold bows, pearls and rhinestone clusters. This is the present box chapter: every tip looks like wrapping paper, ribbon or an ornament.
Sample tips like these are useful as a menu, not as a single manicure to copy nail for nail. Pick one design family for a full set, and use the others as single accents. Gold is the thread: bows, lines, snowflakes and stars all share the same warm metal, so mixed designs look coordinated.
Choosing one design family
A full set built around gift wrap bows looks deliberate: red bases, gold lines crossing like ribbon, and a gold bow on the ring finger. A candy swirl set looks playful: red and white waves with gold edges, plus one bow accent. Choose the family for your christmas nail designs that matches your wardrobe, bows for formal parties, swirls for family gatherings.
Gold, pearls and rhinestones in balance
Gold, pearls and rhinestones together can easily tip into excess, so keep one texture leading per nail. A bow nail can carry gold alone, a pearl nail can carry pearls with one rhinestone, and a snowflake nail can carry gold lines alone. Seal raised decorations with top coat around the stones, so they stay put without looking buried. Our winter acrylic post shows longer festive styles, and the same restraint keeps long sets elegant too.
How to Build Christmas Nail Designs at Home
- Pick your format first. Choose painted art, press-ons, or regular polish, based on the time and tools you actually have this week.
- Choose a palette of four colours at most: red, green, white and gold cover almost every festive look in this post.
- Prep every nail the same way: push cuticles back gently, buff away shine, and clean off dust and oil so polish or press-ons grip properly.
- Paint solids first, then art. Let each base colour dry or cure fully before adding trees, stripes, bows or snowflakes on top.
- Keep art to accent nails. One or two decorated nails per hand give a festive set its focus, while the rest stay solid and wearable.
- Protect your hands and remove gently. Before any lamp session, apply a broad spectrum, water resistant sunscreen with SPF 30 or higher on your hands, and soak gel off rather than peeling it away.
Frequently Asked Questions
What are the easiest Christmas designs for beginners?
Start with solid red or green plus one glitter accent nail, then add a simple candy stripe or a single snowflake once the base routine feels steady. Press-ons with bows are an even easier route to christmas nail designs, since the art arrives finished and only fitting and pressing are needed.
Can I wear Christmas designs on short nails?
Yes, and short nails suit many festive designs well, because trees, ornaments, bows and candy stripes read clearly at short lengths when they are kept simple. Keep art to one or two accent nails, choose small motifs, and avoid full character faces, which need longer nails to be recognised.
Should I choose gel, regular polish or press-ons for Christmas?
Choose gel if you want one festive set to stay put through party season, regular polish if you want to change colours often, and press-ons if you want finished art with no painting. Many people mix formats: gel solids with a press-on accent nail, for example, gives both durability and detail.
How do I keep glitter and rhinestones from lifting?
Apply glitter thinly, place rhinestones on a tacky layer, and seal with top coat around the stones, capping the free edge. Avoid picking at raised decorations, moisturise cuticles daily, and carry a spare press-on or a matching polish for quick repairs during party weeks.
Christmas designs reward a simple rule: one story, one sparkle, and one quiet nail to let both shine. Pick the format that fits your week, start with red, green, white and gold, and follow Beautylicious Hub on Pinterest for more festive nail ideas.