Holiday Nails: 5 Stunning Festive Manicures to Try Now
Holiday nails are at their best when each hand tells a small festive story, and this post follows five photos that do exactly that, from a six-look collage of Christmas characters through a red and gold party look, a black snowman night, a quiet fairy light set and a gift bow finish. These are worn looks, not product packs, photographed on real hands in festive clothes, which makes them easy to judge: you can see how each motif behaves on a real nail, in real light, next to a sleeve or a ring. Every section describes its photo honestly, including the one look that is festive in palette rather than in symbols.
The thread running through all five photos is restraint. Even the busiest collage works because detailed nails sit beside plain supporting nails, and even the boldest red set works because one bow carries the theme. If you take one rule from this post, let it be that one: pick your festive hero, then let the rest of the hand support it quietly.
Six Christmas Stories in Holiday Nails: Shop the Look
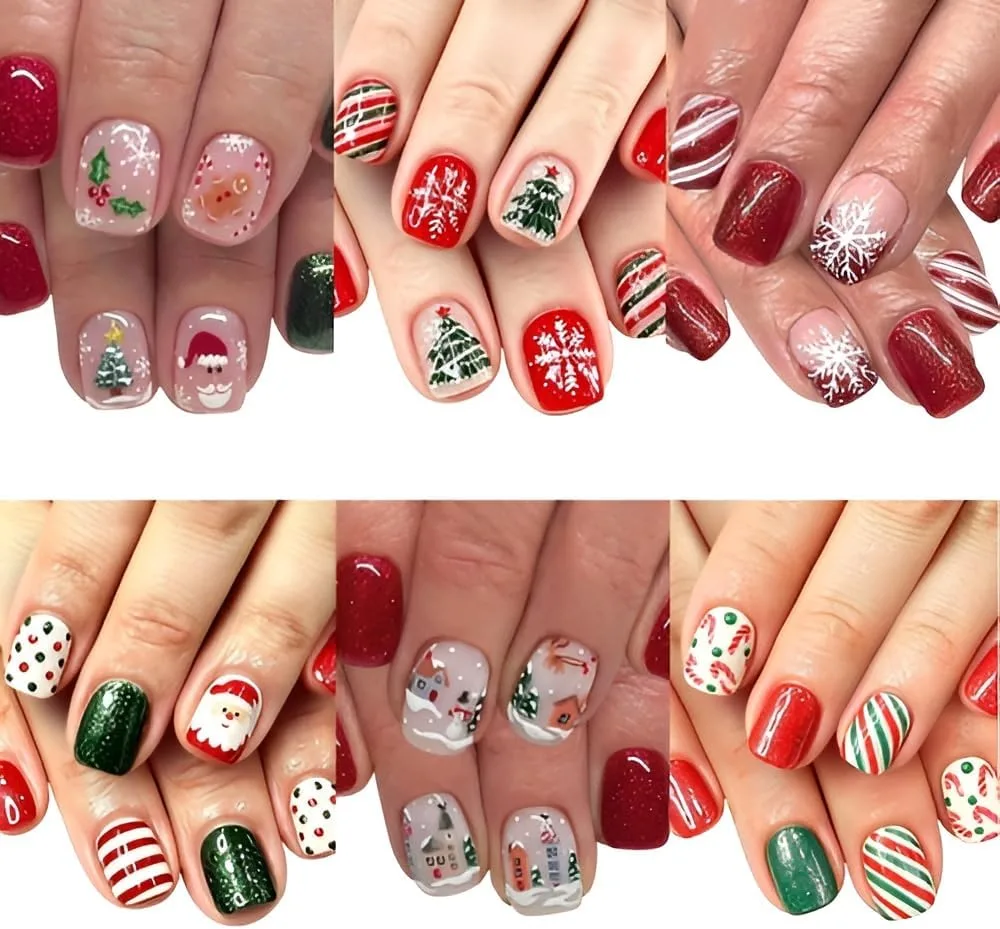
The first photo is a collage of six short squoval and square worn festive looks on a white background, and it reads like a Christmas card collection. Across the six panels you find sheer pink nails with holly leaves and white snowflakes, a gingerbread man on a sheer base, solid red glitter nails, a Santa face on a sheer base, deep green glitter nails, red and white striped nails, candy cane stripes, snowman village scenes on sheer grey bases, red and white polka dots, and green nails with white dots.
The practical lesson of the collage for holiday nails is that a festive set does not need a new shade for every nail. Sheer pink and sheer grey bases repeat across the panels, solid red glitter and solid green glitter repeat as supporting colours, and only the detailed nails change. When you plan your own set, choose one panel as your hero, then borrow its supporting colours for the rest of the hand. A snowman village panel becomes a full set with sheer grey and deep red nails. The panel you love already contains its own colour scheme, so you never need to guess what goes with it.
Choosing a hero from six options
Choose with your calendar, not just your eye. Santa and gingerbread suit family gatherings and playful parties, snowman villages suit quieter days at home, and striped and polka dot panels suit anyone who wants festive colour without character art. The look you will actually enjoy wearing for a week matters more than the look that photographs best for a day.
How collage colours stay coordinated
Coordination comes from repetition: one sheer base, one red, one green, one glitter, used across the whole hand.
Red and Gold Party Florals in Holiday Nails: Shop the Look
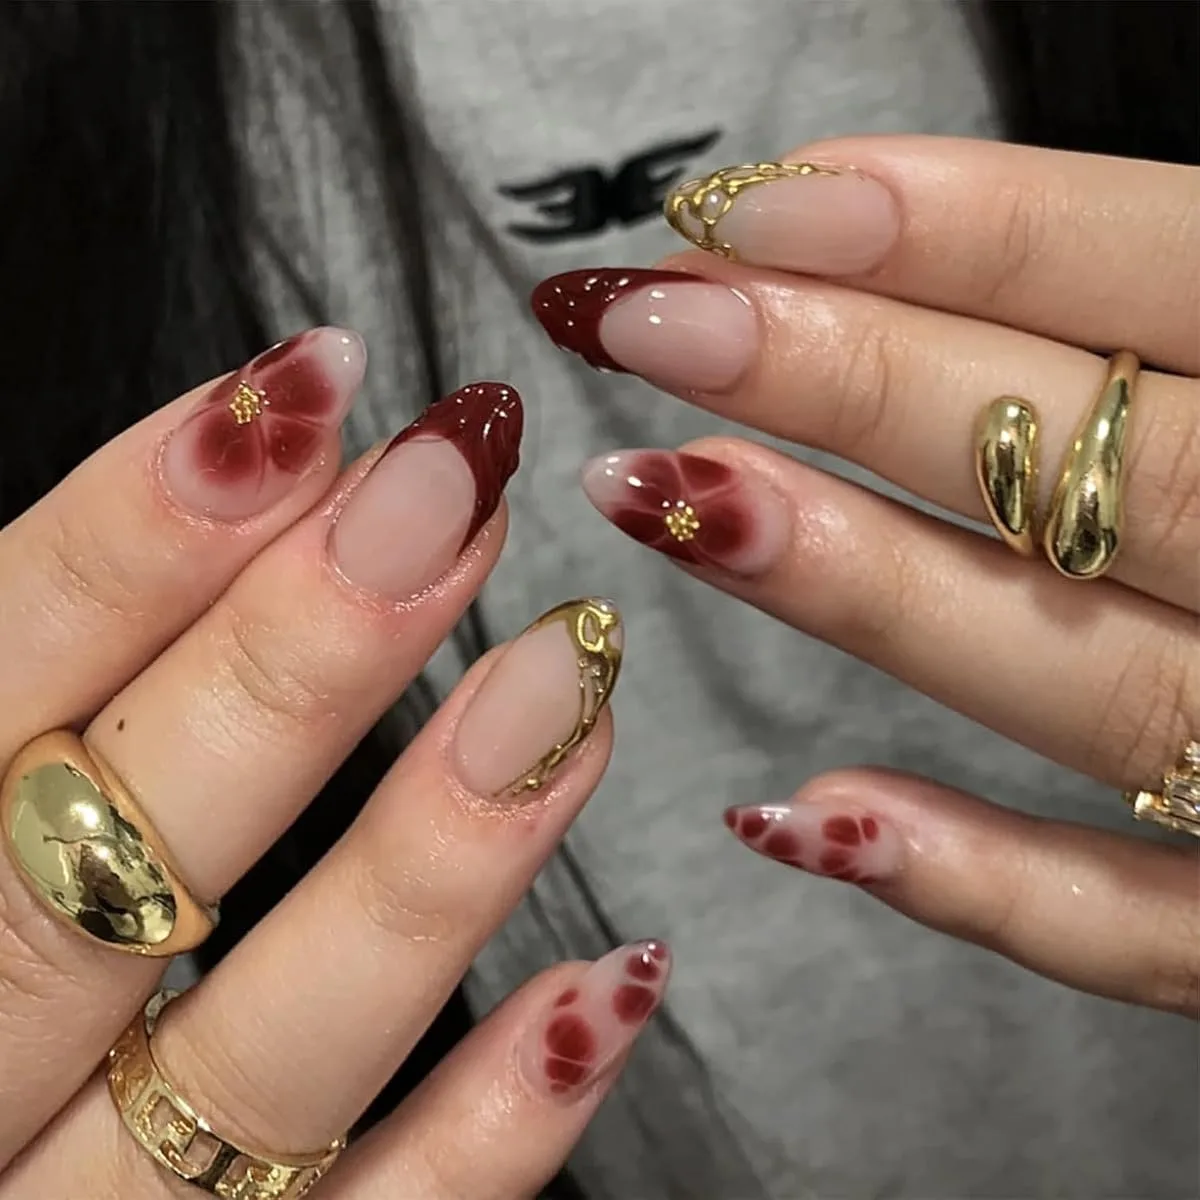
The second photo is the elegant outlier of the post, and it is framed honestly as such. It shows long almond nails with sheer nude bases, deep red diagonal French tips, deep red blurred flower petals with tiny gold centres, gold chrome outline details, and chunky gold rings. There is no Santa, no tree and no snowflake here, yet the deep red and gold palette places it firmly in December, as the party look for occasions where character art would feel too playful.
The design works through contrast between structure and softness. The diagonal French tip is crisp and graphic, the blurred flower petals are soft and watercolour-like, and the gold centres and chrome outlines tie the two together. That pairing is easy to adapt at home: paint a nude base, add a deep red diagonal tip with a steady hand, then press a small red flower onto one accent nail using a dotting tool or a fine brush, finishing with a tiny gold dot at the centre. Keep the flower to one or two nails, since the blurred petals are meant to be an accent for holiday nails, not a pattern across the whole hand.
When to choose florals over characters
Choose florals when the occasion is formal, when your outfit is already detailed, or when you want a set that still looks right in January. Character art dates a manicure to Christmas week, while red and gold florals read as winter glamour for much longer, which matters if you wear one set for a full stretch.
Gold details without overdoing it
Gold works best in this set when it stays an accent rather than a second hero. Keep the gold to the flower centres and the thin chrome outlines, and leave the rest of the hand to deep red and nude, so the eye lands on the florals first and the gold second. One or two gold detailed nails per hand are enough, and matching the gold tone to your rings keeps the whole look deliberate. When gold spreads to every nail, the set turns busy and the red loses its richness, which is the opposite of the quiet luxury this photo is selling.
Black Snowman Night in Holiday Nails: Shop the Look
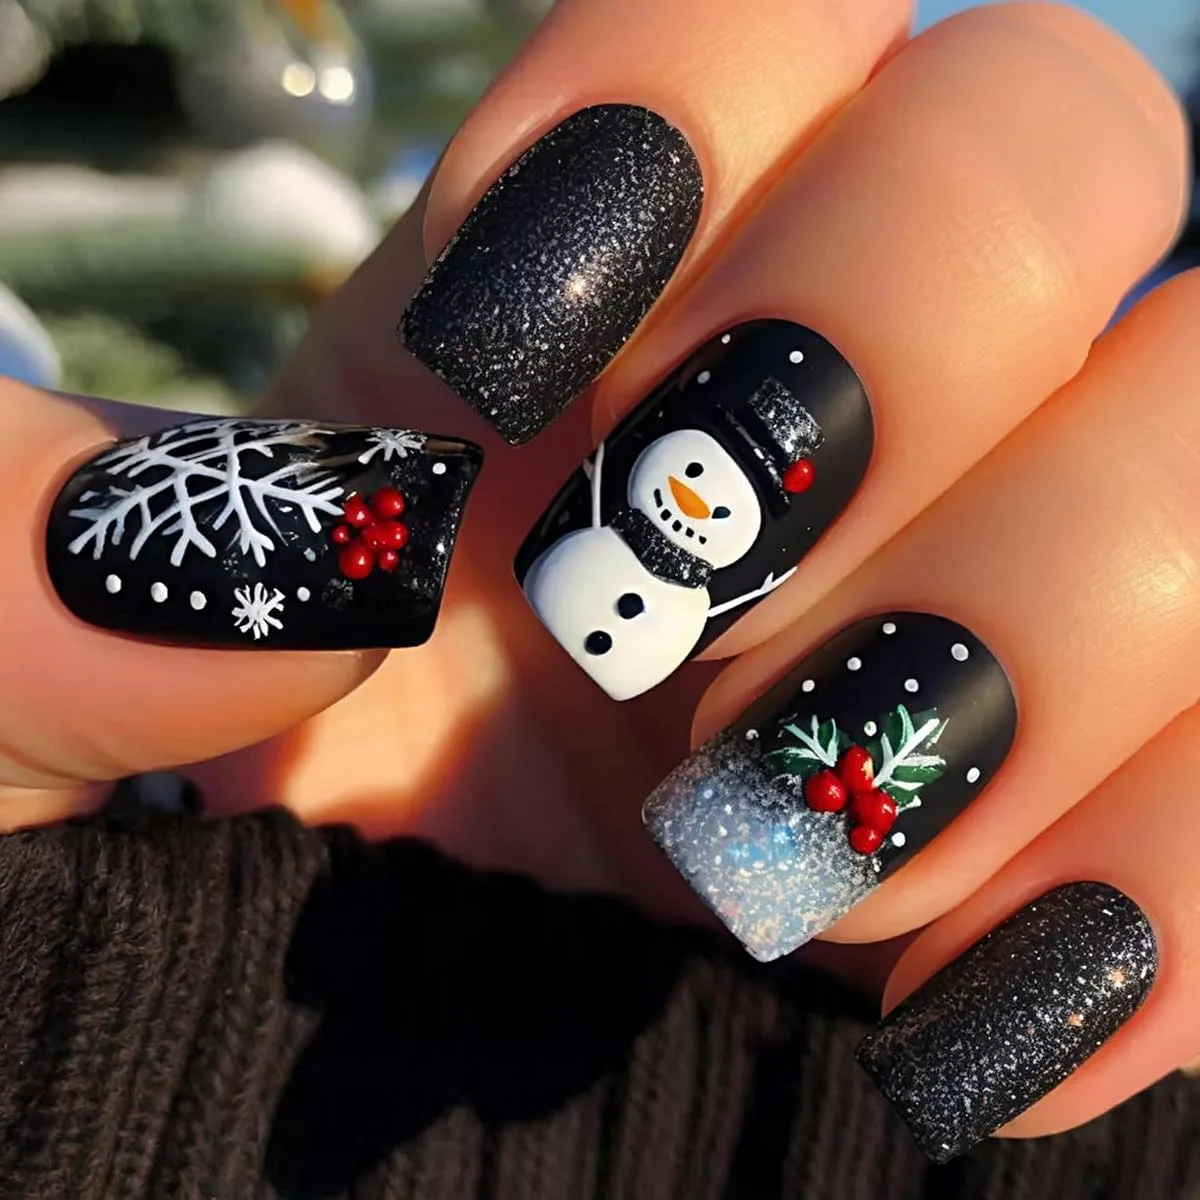
The third photo is the most dramatic festive look in the post: short to medium square nails on a black base, photographed against a dark knit sleeve. The set carries black glitter nails, large white snowflake art, a snowman face with an orange nose and a black hat on a matte black base, red berries with green holly leaves, and a silver glitter gradient tip.
Painting this look well depends on patience with the black base. Thin coats kept inside the sidewalls give a clean edge, and the white art must go over a fully dry or cured base so it stays crisp. The snowman face deserves a dedicated accent nail, painted slowly with a fine brush, while the snowflake can be a simpler six-arm star shape with dot details rather than a perfect crystal. One snowman nail and one snowflake nail per hand are plenty for holiday nails; the glitter, berry and gradient nails fill the rest of the hand with colour and texture. Our winter holiday looks post covers deeper winter tones that pair with this black based idea, for readers who want the night-time mood without the character art.
Building a dark festive set step by step
Start with the black base on all nails, then add glitter to one nail per hand, berries to another, and character art to a third.
Why black suits festive art so well
Black gives white art its highest possible contrast, which is why snowflakes, snowmen and stars all read clearly even at short lengths. It also makes a festive set wearable with dark winter outfits, since the nails then belong to the outfit instead of standing apart from it.
White Fairy Lights in Holiday Nails: Shop the Look
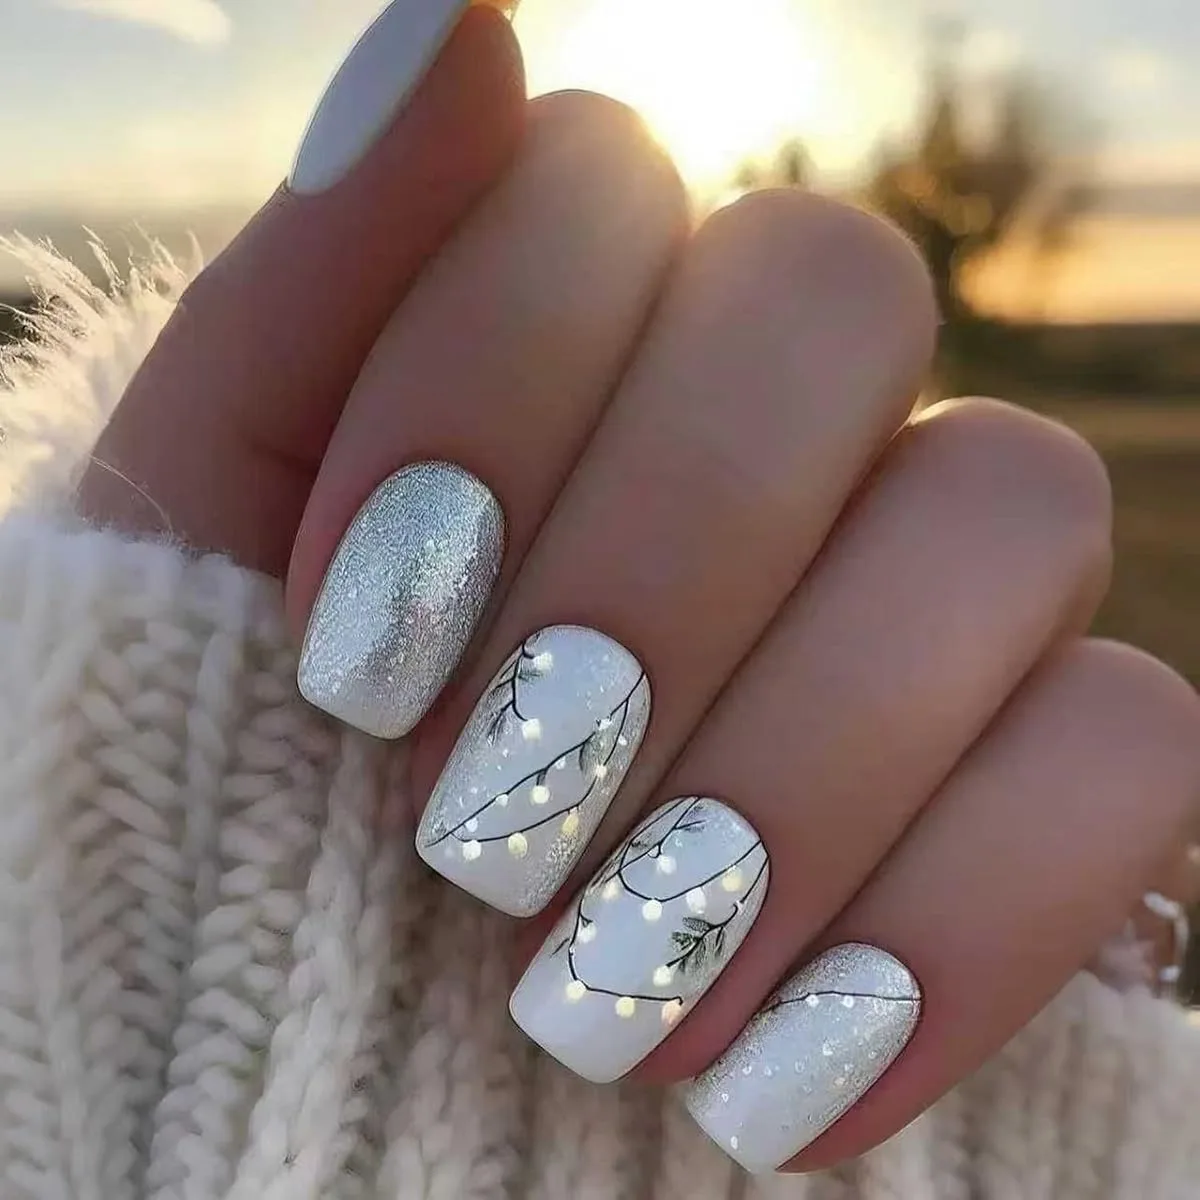
The fourth photo is the calm centre of the post: medium squoval nails with white bases, silver glitter nails, and black line fairy light art carrying small glowing bulbs and tiny green sprigs, photographed against a white knit sleeve in sunset light. This is the festive look for readers who want seasonal nails without announcing Christmas from across the room.
Fairy light art is the most forgiving festive art to paint for holiday nails, because real fairy lights sag and curve, so an imperfect line still looks right. Paint the white base first, then draw a loose black curve across two nails once the base is fully dry or cured, dot small bulbs along the line, and add a tiny highlight dot to each bulb for glow. Seal with top coat so the black line does not smudge. Two light art nails, one silver glitter nail per hand and plain white on the rest give a finished set that suits offices, family days and quiet evenings alike.
Keeping a white festive set bright
White bases need edge care: cap the free edge with top coat, refresh the top coat every few days, and avoid dark dye transfer from new denim or knitwear on the first day.
Silver glitter as quiet sparkle
Silver glitter in this set plays a supporting role, echoing the light bulbs without competing with them. One glitter nail per hand, placed beside a light art nail, is enough to make the whole hand shimmer gentf.
Red Gift Bows in Holiday Nails: Shop the Look
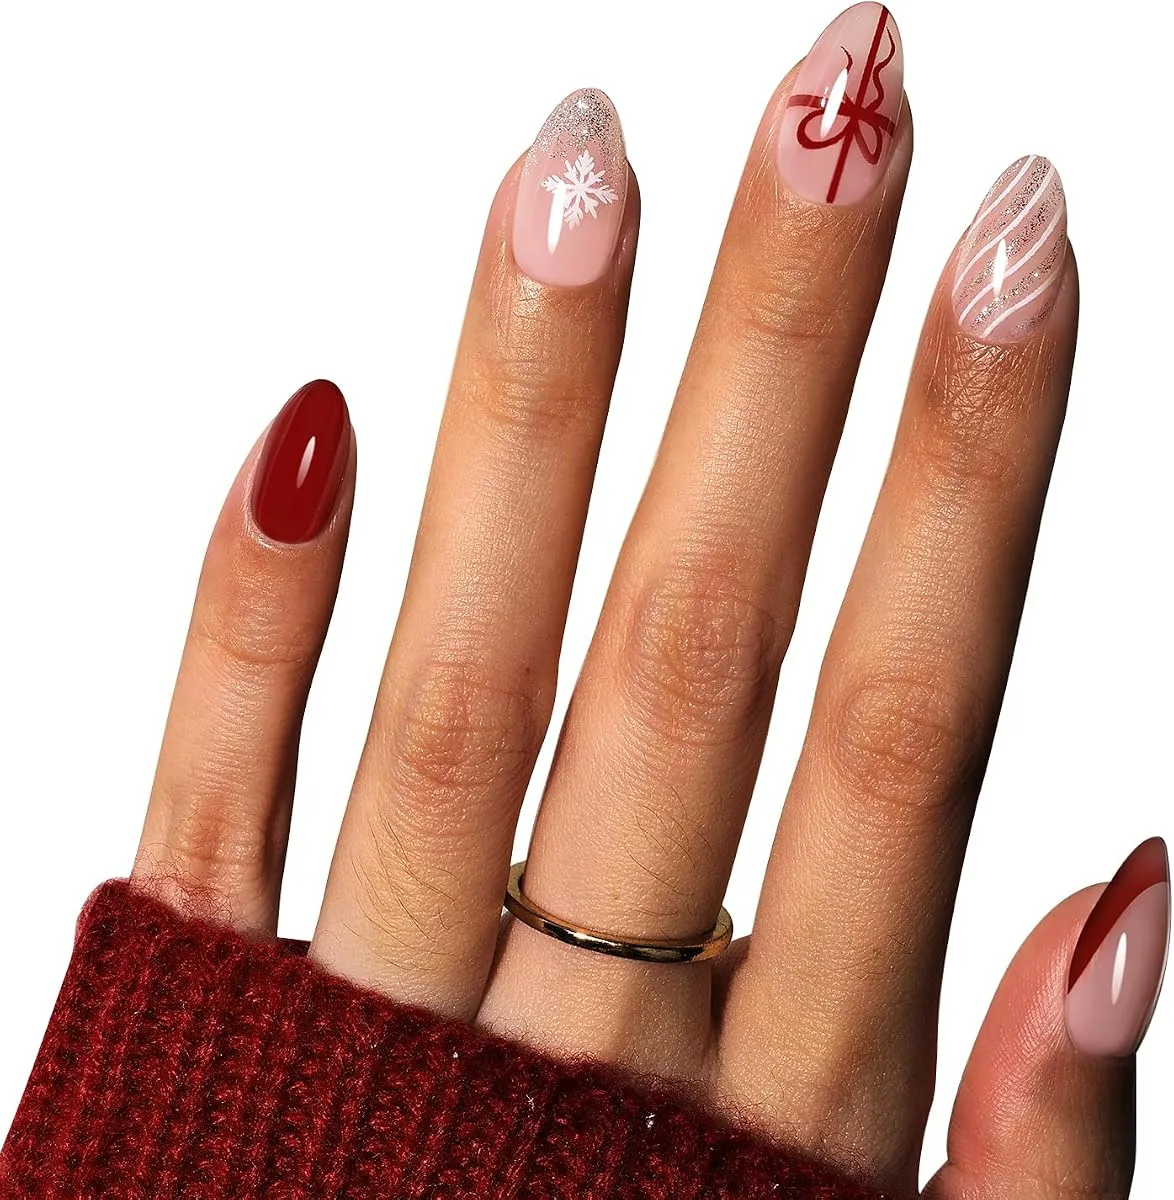
The fifth photo closes the post with the most gift-like look of all: long almond nails on a hand in a red knit sleeve, carrying solid deep red nails, sheer pink nails with a white snowflake and a silver glitter tip, sheer pink nails with a red gift bow and ribbon lines, sheer pink nails with white and silver diagonal stripes, and sheer pink nails with a deep red diagonal French tip.
Bow art for holiday nails is generous to beginners, since a bow is built from a few strokes: two loops, a centre knot and two short ribbon tails, drawn in that order with a thin brush. Keep the loops equal, the knot small and the tails short, and the bow reads clearly even on a shorter nail. The rest of the hand in this photo shows how to support a bow without upstaging it: solid deep red gives richness, sheer pink gives breathing room, and one striped nail and one snowflake nail add variety without adding another hero. One bow per hand is the right amount for everyday wear, and the set stays wearable well past Christmas if the bow is swapped for a plain deep red nail on the next change. Our festive art looks post continues the art theme with candy stripes and gingerbread, for readers who want more hand-painted festive ideas.
Drawing a bow that reads as a present
A bow reads as a present when it sits on a plain background with ribbon lines running across the nail like wrapping paper. Paint the bow slightly off centre so the loops have room to breathe, and size the loops to the nail width so a small nail gets a small bow rather than a cramped one. Red ribbon on sheer pink gives the clearest present effect, and short tails keep the bow from looking like plain stripes. One bow per hand, placed on the ring finger, is the classic choice that photographs well and still feels wearable.
Pairing a bow with solid festive colours
Solid deep red is the best partner for a red bow, because it lets the bow be the only red detail that draws the eye, while sheer pink keeps the hand light.
How to Wear Holiday Nails at Home
- Choose your festive hero first. Pick one motif per set, a Santa face, a snowman, fairy lights or a gift bow, and let the rest of the hand support it.
- Keep the palette small. One sheer base, one red, one green and one glitter cover almost every look in this post.
- Prep every nail the same way: push cuticles back gently, buff away shine, and clean off dust and oil so polish grips properly.
- Paint thin coats only, letting each regular coat dry to the touch or curing each gel coat before the next, and cap the free edge every time.
- Paint art last, one nail at a time, and seal detailed nails with two thin top coat layers so art edges do not lift or smudge.
- Protect your hands and remove gently. Before any lamp session, apply a broad spectrum, water resistant sunscreen with SPF 30 or higher on your hands, and soak gel off rather than peeling it away.
Frequently Asked Questions
Can I mix Santa, snowman and bow art in one set?
You can, but one hero per hand looks better than three heroes competing. Use the collage in this post as a menu, pick one panel for each hand at most, and fill the remaining nails with solid supporting colours from that panel.
Which festive look lasts best through a busy December week?
Simpler looks last best, because art edges are the first thing to chip. Fairy lights sealed under two top coat layers, solid deep red, and one glitter accent nail survive daily wear better than full character art on every nail.
How do I paint white snowflakes without them looking messy?
Use two thin white layers for opacity, keep the brush barely loaded, and draw a simple six-arm star with dot details rather than a complex crystal. Practising the star on a spare tip first makes the real nails far neater.
Are red and gold florals suitable for formal festive events?
Yes, they are often the best choice for formal events, because deep red and gold read as glamorous without novelty. They also stay wearable after Christmas, unlike character art, which dates a set to the holiday week itself.
Festive looks work best when one motif leads and the rest of the hand follows quietly. Pick the story you want your hands to tell this December, and follow Beautylicious Hub on Pinterest for more seasonal nail ideas.